This tool allow you to use the new 15 blogger templates at your blog and customize it’s:
* Colors,
* Background,
* Fonts,
* Use hundreds of images as patterns,
* Change layout,
* Adjust width,
* Customize Links,
* Footer And Tabs.
Watch This Amazing Video:
How to Use it:
At First Before Starting Using it, I advice you to choose Minimma Template By Going to Layout and Click on Pick New Template, as it's simple and you can be customized Easy, and don't Use Templates that you downloaded from Templates Sites, as there will be a lot of options Disabled
To use it, you have to go to Blogger Draft because it's only avalaible at Blogger Draft, You can't find it at the normal Blogger
Now from the Blogger Draft Dashboard go to Layout and you Will find this button (Click on the Image to Enlarge it):
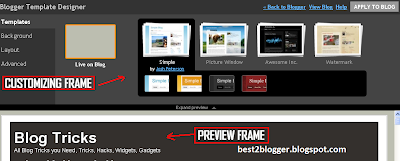
Then Click on Template Designer, you will go to page seprated into 2 parts:
- Top --> Customization Frame,
- Bottom --> Preview Frame
The important part is Customization Frame in which you can customize the following:
- Templates,
- Backgrounds,
- Layout,
- Advanced Settings
Customize The Template:
You should start customization By choosing your template that found under 4 classifications:
- Simple,
- Picture Window,
- Awesome Inc,
- Watermark
Customize the Background:
After Customizing the Template, Click on the Background tab on the left.
In Background Section you can change your main background Image or Color and customize the template elements.
Blogger has added hundreds of backgrounds that suite all the topics, niches and users
There's more than 20 Categories in the Background Image.
You can access it by clicking on Background Image in the Background Section. This window will appear to you:
Customize the Layout:
This is the most important Section in Customizing the Template, as you can customize the layout of your template and choose how many columns in the Body and in the Footer, You can also adjust the size of the body, sidebars, footer, and everything in your template.
There's 3 Sections in the Layout tab:
- Body Layout,
- Footer Layout,
- Adjust Size
I will start explaining the function of each section:
- Body Layout:
- Footer Layout:
- Adjust Size:
From Here you can customize everything in your blog and in each element you customize its fonts and colors and from this elemnets:
- Page Text: This is the Normal Text in your Page
- Background: There's 2 Sections, the Outer Background that customize the outer background of your template, and the Footer Background which customize the Footer Background Which found at the bottom of the Template
- Links: There's 3 Sections, the Link Color, the Visited Link Color, the Hover Color that customize the color of the link when you pass on it (put the mouse on it)
- Blog Title: Customize the Title of your Blog from Title Font, Title Color, Description Color
- Tabs Text: This is the tabs element and you can customize it's Text Font, Text Color, Selected Color
- Tabs Background: The Background of the Tabs which you customized in the previous section
- Date Header: Date of the Published Posts, you can customize it's Font and Text Color
- Post: You can Change the Title Font, Background Color of the Posts, and the Border Color which surrounds every post
- Post Footer: This is the Footer of the post, which contains (Author, Time, Comments, Backlinks, EMAIL Post, Labels) and from here you can customize the Text color in the Post Footer
- Gadgets: It's the Gadgets that found in the sidebars, From here you can customize the Title Font, Title Color, Alternate Color
- Footer: You will change the Text Color in the Footer, and change the Gadget Title Color
- Footer Links: You can customize the Link Colors in the Footer
- Add CSS: You can add Custom CSS Style to the Template, You can know more about this from Google Help Click HERE
At Last:
At Last After Customizing Everything in your Template You have to save this change or apply it to your Blog, You will find Orange Button with text "Apply to Blog", Click on It and everything will be saved. as the following (Click on the Image to Enlarge it):
Hope it was a Good TOPIC :)
If you Liked it Share it :)


